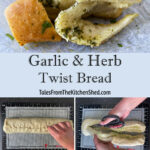
Garlic and Herb Twist Bread

Who can resist warm, buttery bread infused with fresh herbs and garlic ? My Garlic and Herb Twist Bread is ideal for family dinners, BBQs and entertaining guests.
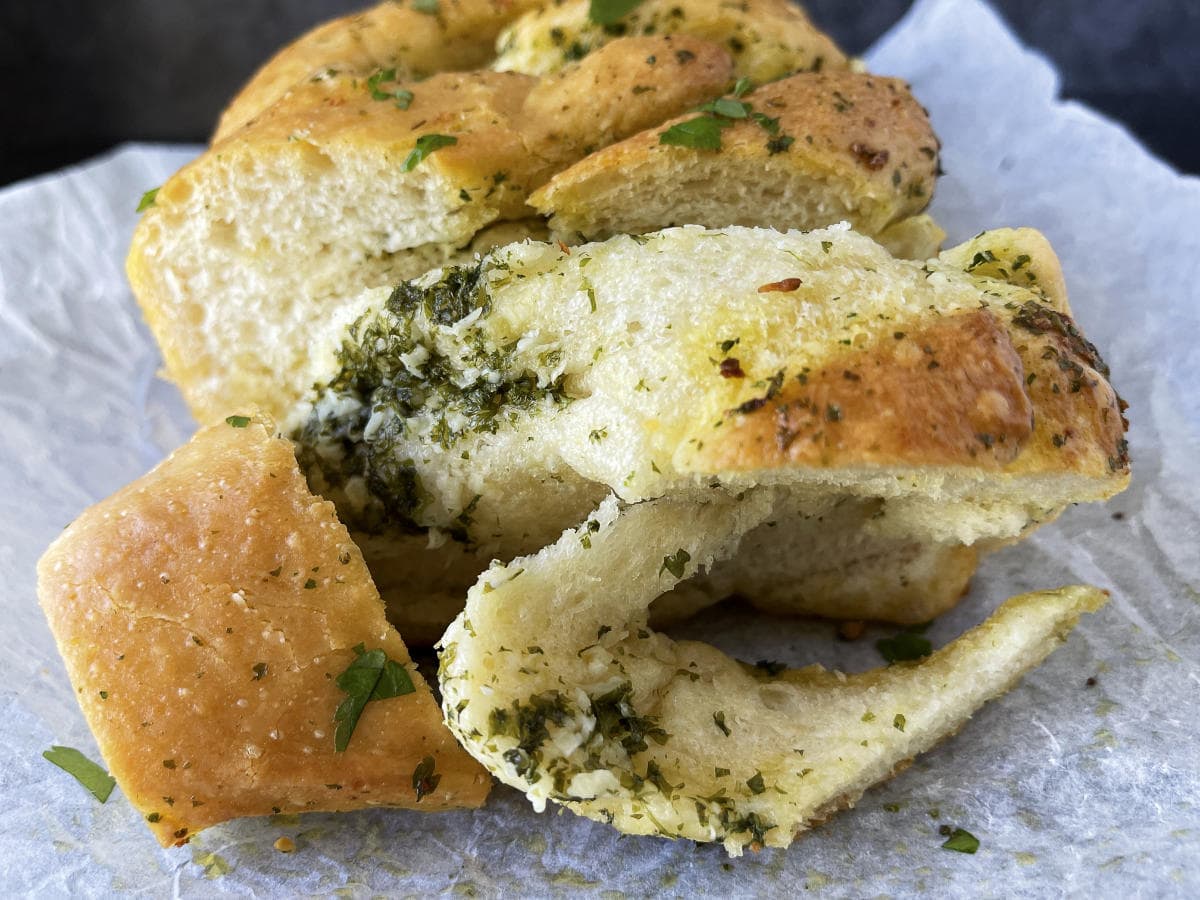
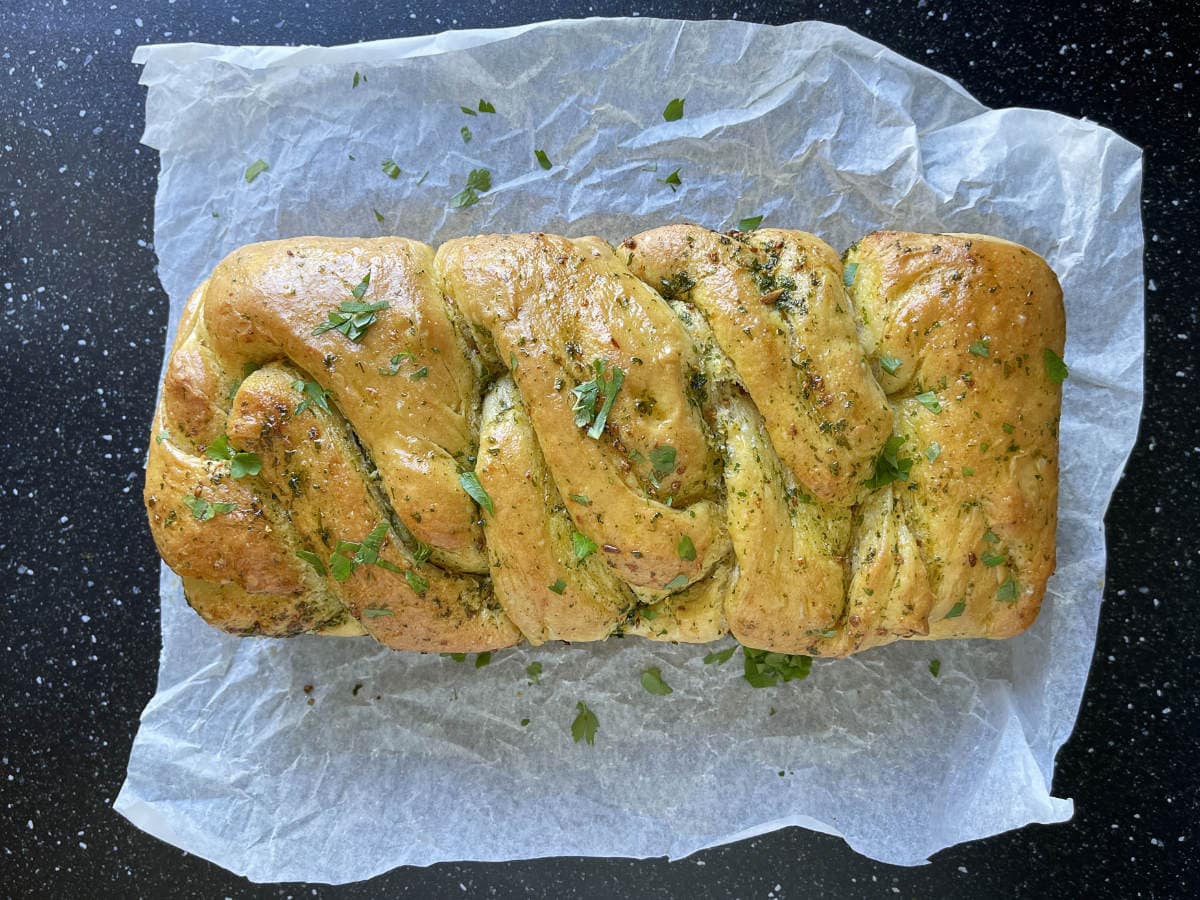
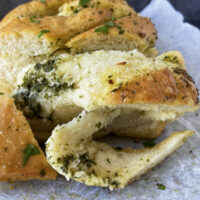
A surprisingly easy homemade twisted bread made with a basic dough, fresh herbs and garlic butter. Simply baked until golden brown for a great tear and share loaf.
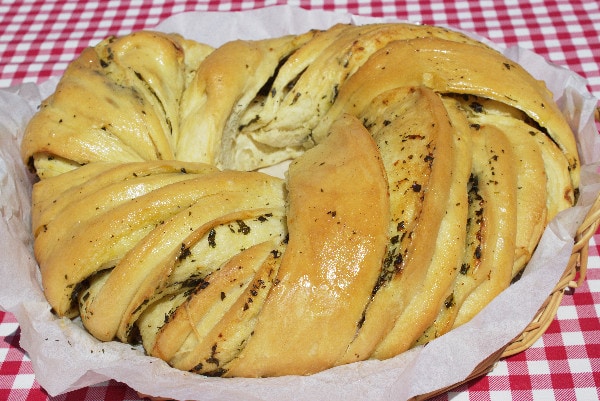
Originally, I made my twist bread freestyle and formed it into a circular shape. Over the years I’ve simplified the shaping and now bake this loaf in a tin. It’s an easier twist shape to form but tastes just as delicious as the free form circle.
At The Kitchen Shed, we have a real love for garlic and herbs on our bread, with garlic naan being a firm favourite. Experiment with a few fillings, such as with my cheese and pickle bread, and you can enjoy even more flavour.
Why you’ll love this recipe
- Incredible flavour – This homemade garlic and herb twist bread is loaded with fresh garlic and fragrant herbs. Combined with rich buttery layers of your own soft, from scratch dough. It’s far superior to store bought garlic bread made with ultra processed ingredients. Enjoy traditional artisan bakery flavour at home.
- Soft and fluffy texture – My tried and tested soft bread roll dough bakes up perfectly pillowy and tender every time.
- Easy homemade bread recipe – You only need about 20 minutes of hands on prep. While the dough rises and bakes, you’re free to get on with your day. In just 3½ hours, you’ll have a freshly baked garlic and herb twist loaf ready to serve.
- Perfect family sized loaf – this recipe makes one generous 2lb (900g) loaf, ideal for sharing with the whole family.
Equipment you’ll need
- Stand mixer (optional) – I use my KitchenAid but you can knead by hand.
- 2lb (900g) loaf tin – I recommend the MasterClass bread tin (its heavy gauge steel gives an even bake).
- Baking parchment – to line the bread tin.
What ingredients do I need ?
Bread dough
- Bread Flour – I like to use Marriage’s Very Strong White Bread Flour, which is 100 % Canadian flour. This flour has the advantage of being high in protein and so produces more gluten. As a result, the dough holds together well but is also very elastic and perfect for making soft and fluffy bread.
- Yeast – I’ve used instant yeast in the recipe, often called fast action or quick yeast. This yeast has the advantage that you can add it directly to your flour.
- Salt – I like to use sea salt as it contains less sodium than regular salt but any fine salt will work.
- Sugar – it’s just the right amount of food to get the yeast activated without adding too much sweetness to the soft bread dough.
- Oil – I like to use refined rapeseed / Canola oil because it’s flavourless and gives the best results in this recipe. That said, I’ve also had good results with sunflower oil.
- Lukewarm Water – you should be able to comfortably dip your finger into lukewarm water.
Garlic and herb butter
- Butter – I used salted butter. Unsalted can be used with a teaspoon of salt added for flavour.
- Garlic – fresh garlic cloves work best.
- Fresh herbs – a handful of your favourite herbs, parsley, oregano, basil and chives work well. Be careful if you use rosemary or thyme, it can be quite pungent so use sparingly.
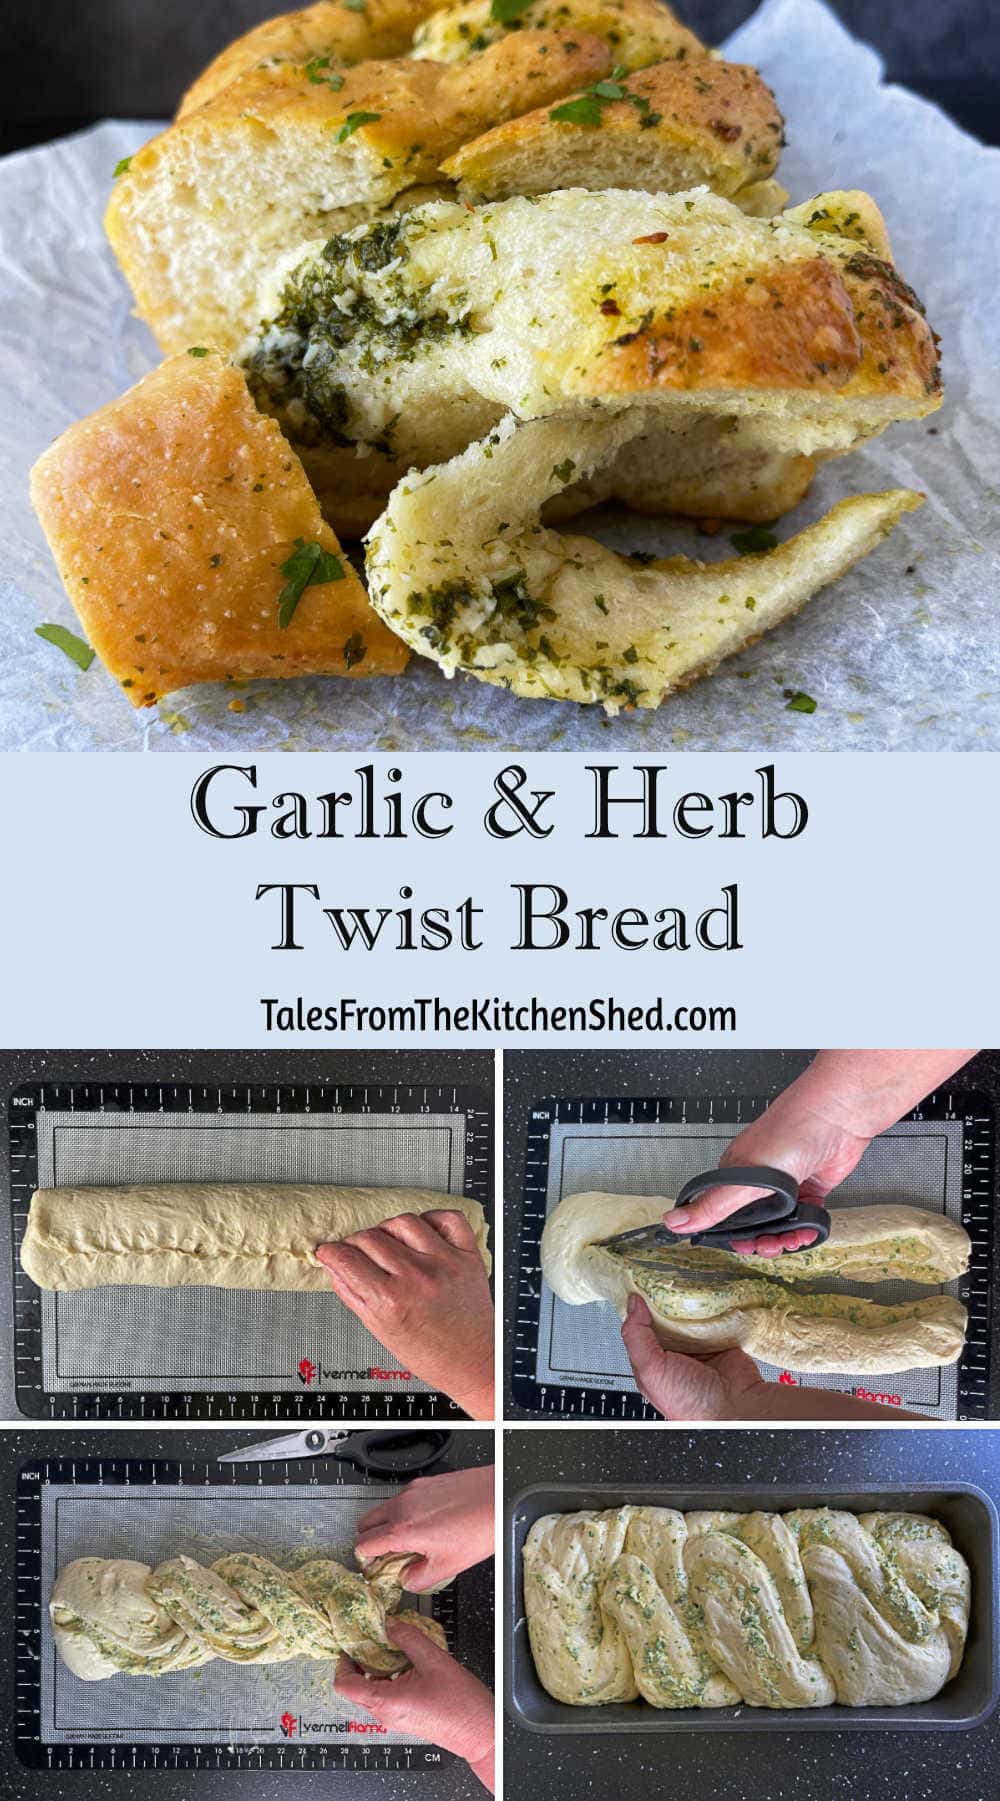
How to make Garlic and Herb Twist Bread
Make the dough
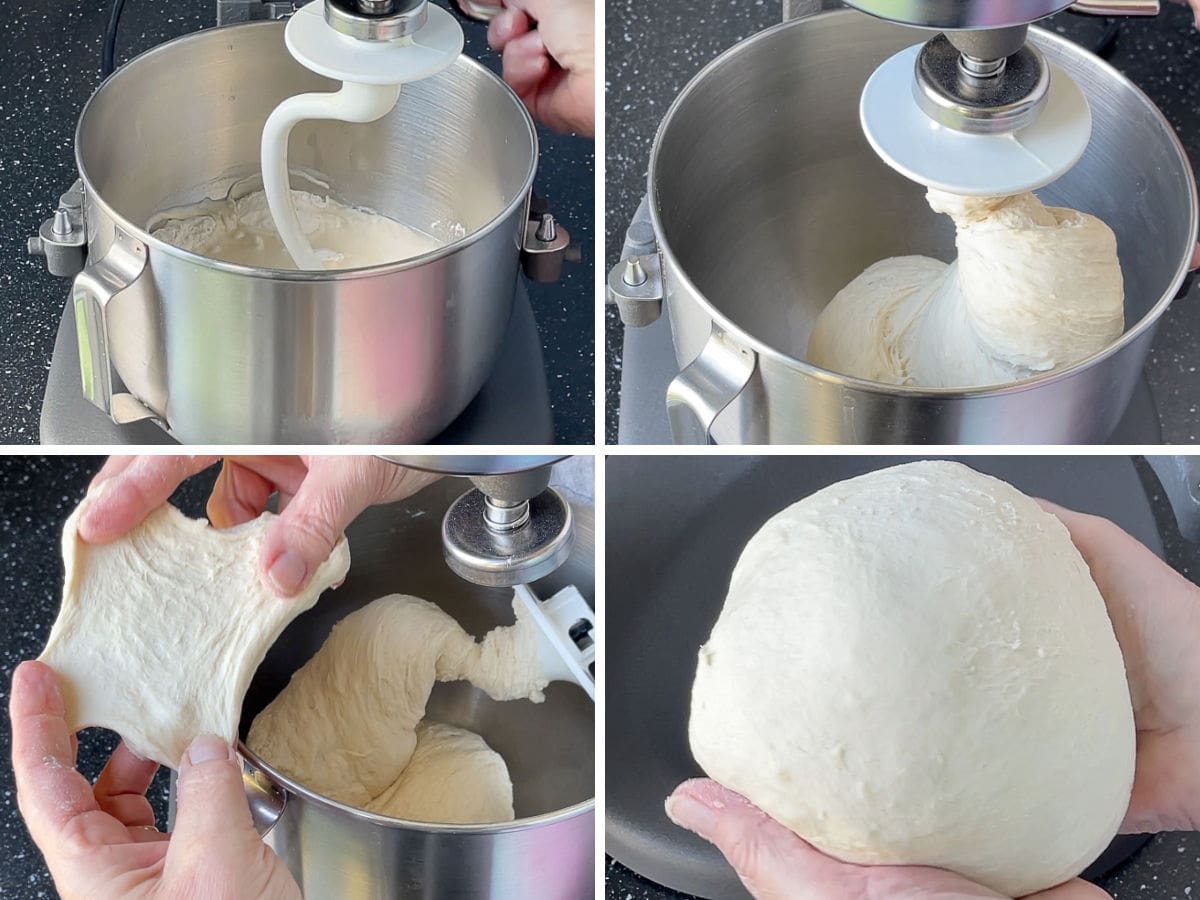
- In a stand mixer: Knead all the ingredients on a slow speed for 10 to 12 minutes until the dough is smooth and elastic.
- By hand: Mix the ingredients in a bowl and then knead on a counter top.
- Cover your dough and leave it to rise for about 1 ½ hours in a warm place (longer in cooler conditions).
- Once your dough has doubled in size, transfer it to a lightly oiled work surface.
Prepare the Garlic Herb Butter
- Mix butter, crushed garlic and chopped herbs.
Shaping and filling
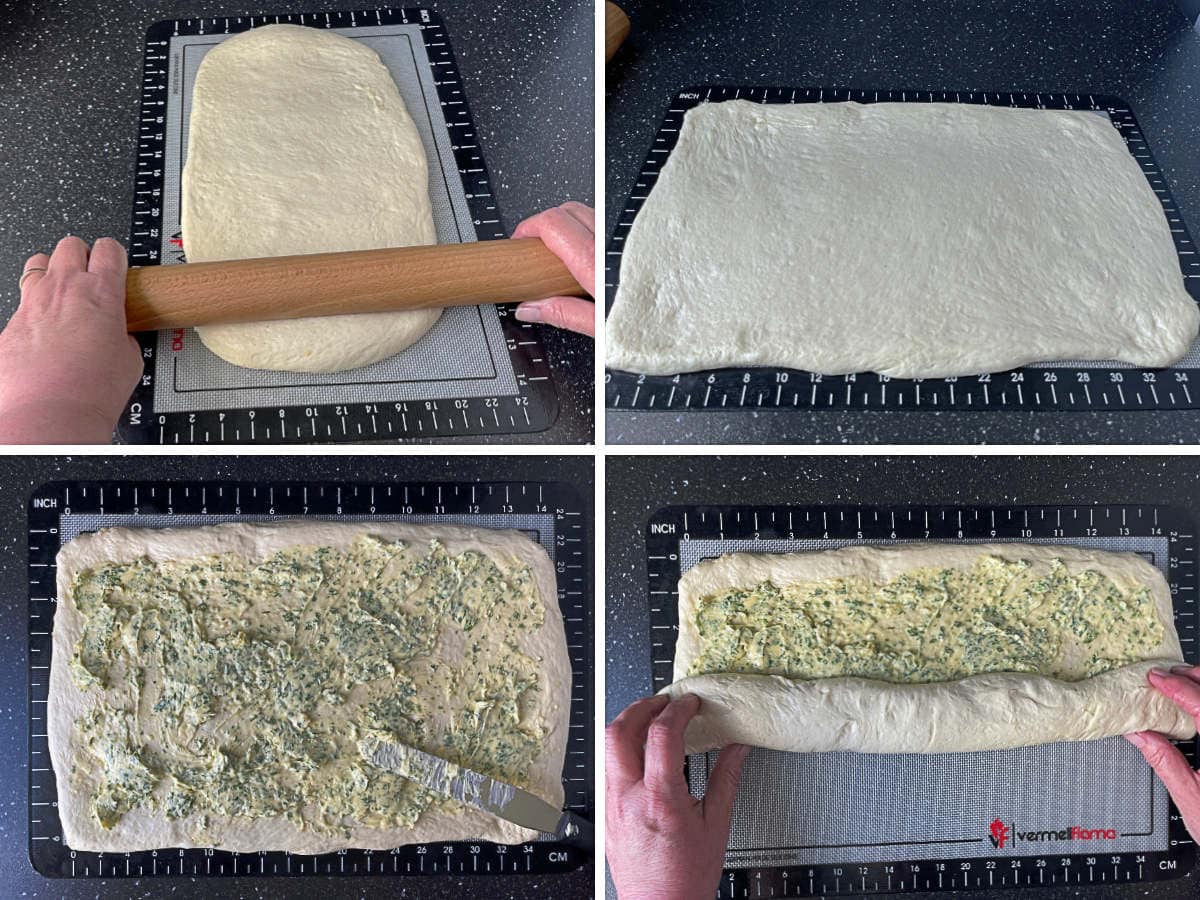
- Shape by rolling the dough into a rectangle and spreading the garlic herb butter evenly over the surface.
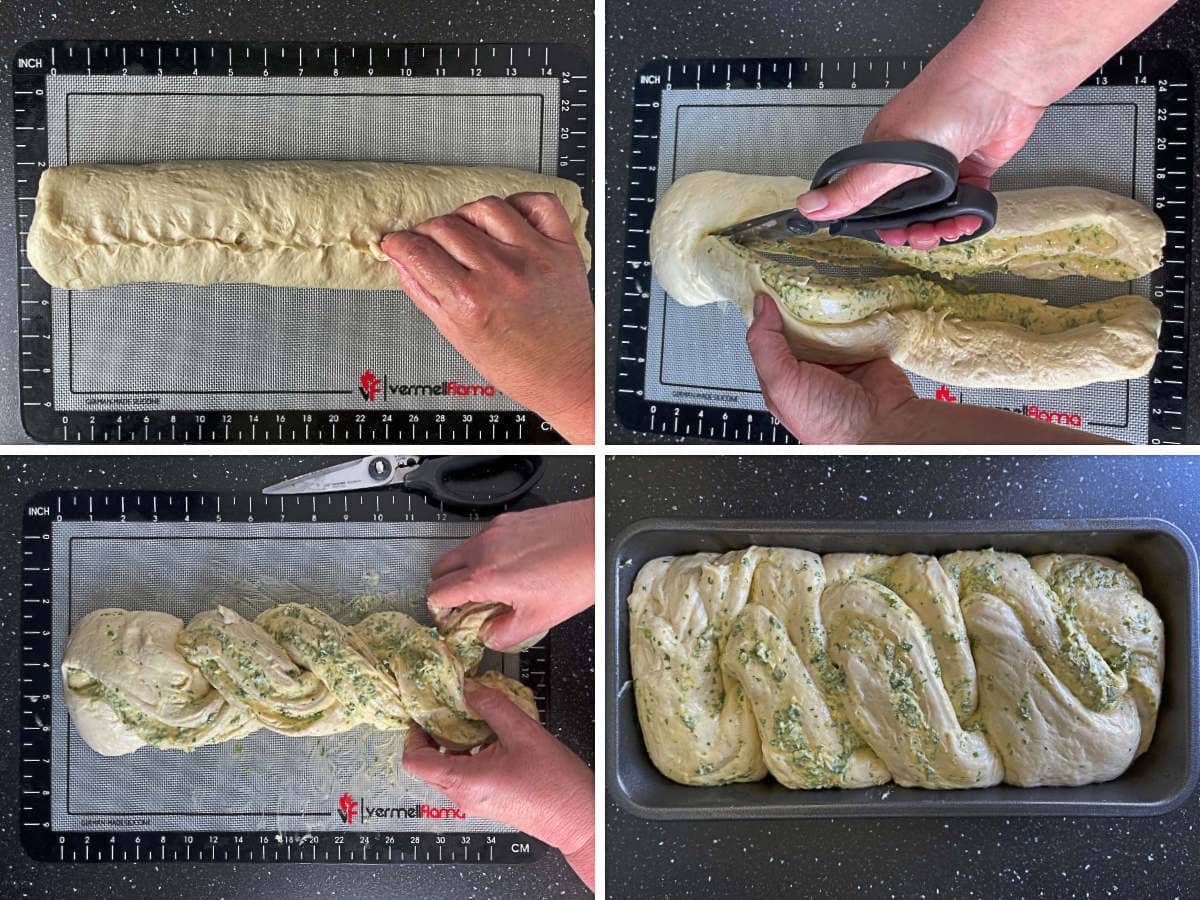
- Roll up tightly into a log just as you would for cinnamon buns and cut in half lengthwise revealing the layers.
- Twist the two halves together, keeping the cut sides facing upward, before placing in your bread tin.
Second rise and bake
- Cover loosely and let rise for 30 – 45 minutes.
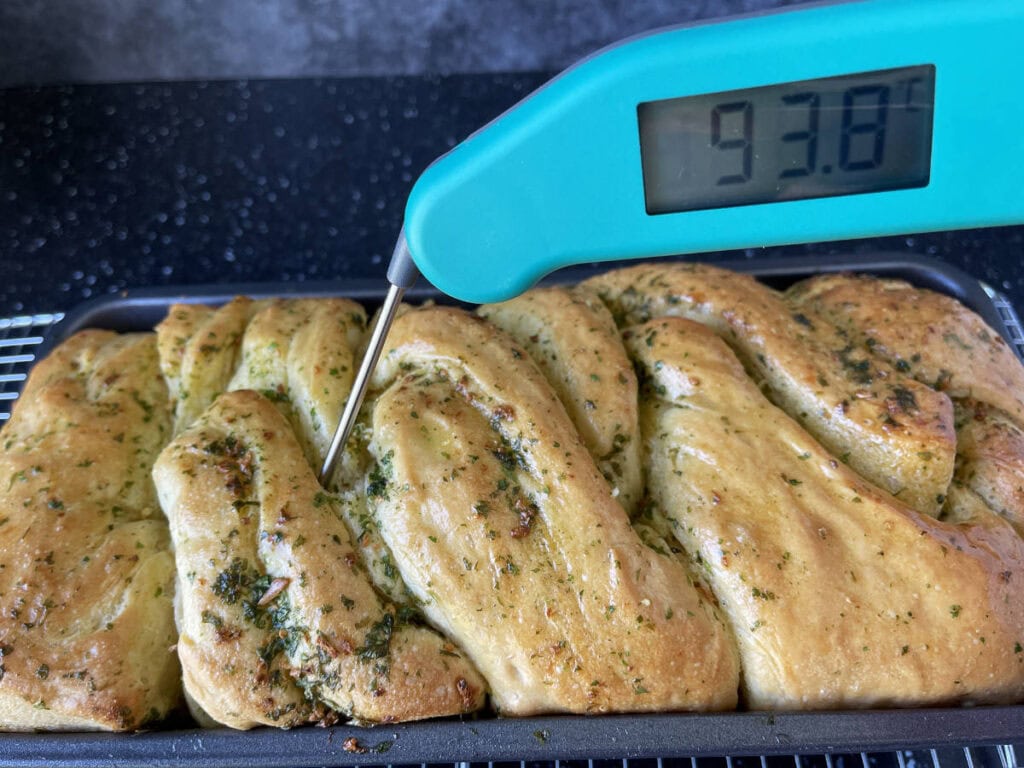
- Bake for 30 – 35 minutes until golden brown. An easy way to check your loaf is sufficiently baked is to measure the internal temperature with a food thermometer. The internal temperature of your loaf should be 90°C / 194°F to 95°C / 203°F. My favourite Thermapen comes into its own for this check.
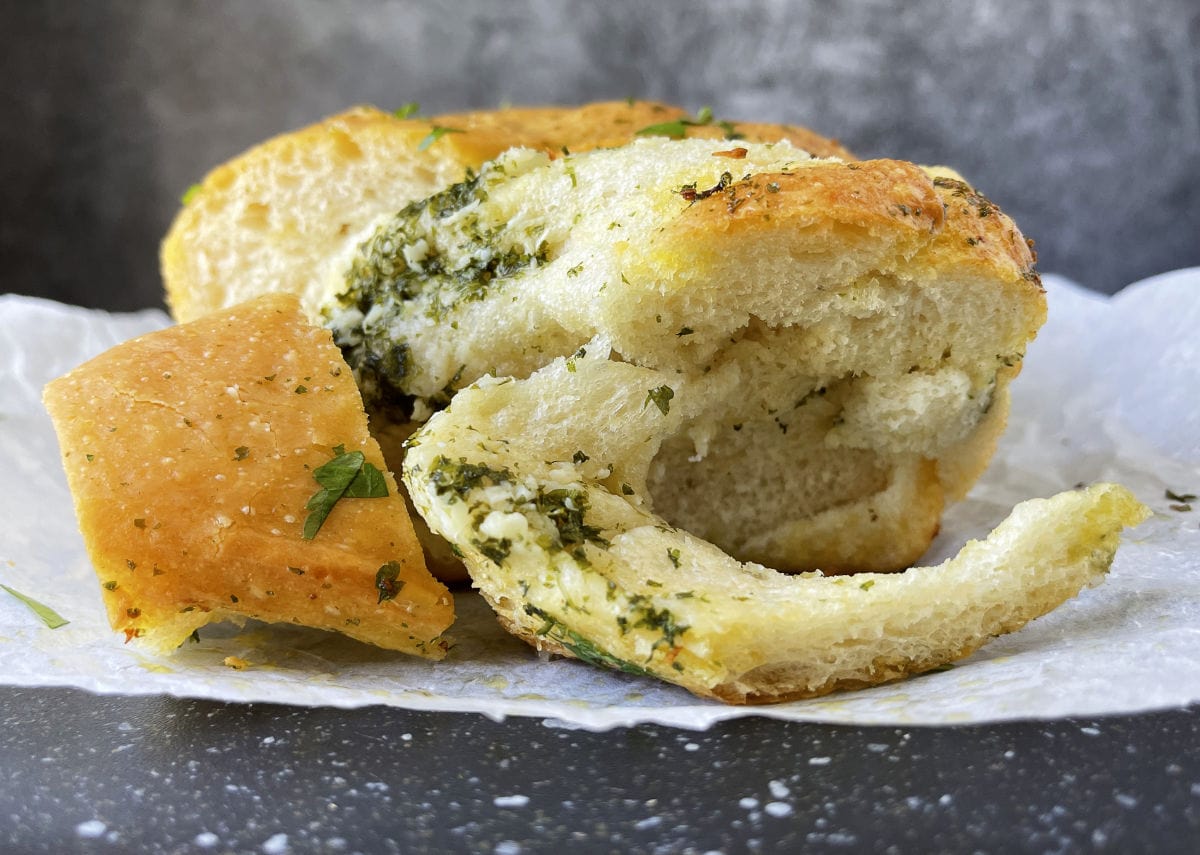
- Brush with extra melted butter and sprinkle fresh parsley before serving.
Tips for Perfect Garlic and Herb Bread
- Kneading – check your bread dough is nice and elastic by using the window pane test.
- Use lukewarm water – you should be able to comfortably dip your finger into lukewarm water. Yeast works best at around 37°C / 98°F.
- Use fresh herbs and garlic for the best flavour.
- Make sure you roll up the long side tightly into a log and pinch the seam together. This helps prevent the garlic and herb butter leaking and keeps all the flavour in your bread.
- Let the bread cool slightly before serving.
Variations
This versatile garlic bread recipe can easily be adapted:
- Cheesy Garlic Twist Bread – Add shredded mozzarella and grated Parmesan between the layers for an extra gooey, savoury twist.
- Spicy Garlic Herb Bread – Mix ½ teaspoon chilli flakes into the garlic herb butter for a touch of heat.
Storage & Freezing
Room temperature: Store Garlic and Herb Twist Bread in a bread bag or airtight container for up to 3 days. Sometimes, bread can become a little stale after a couple of days. Just reheat for 5 to 10 minutes to warm through.
Freezing: Cool completely, wrap well, and freeze for up to 3 months. You can also slice before freezing so you can take out just what you need.
Defrosting: Leave at room temperature for a couple of hours.
Serving suggestions
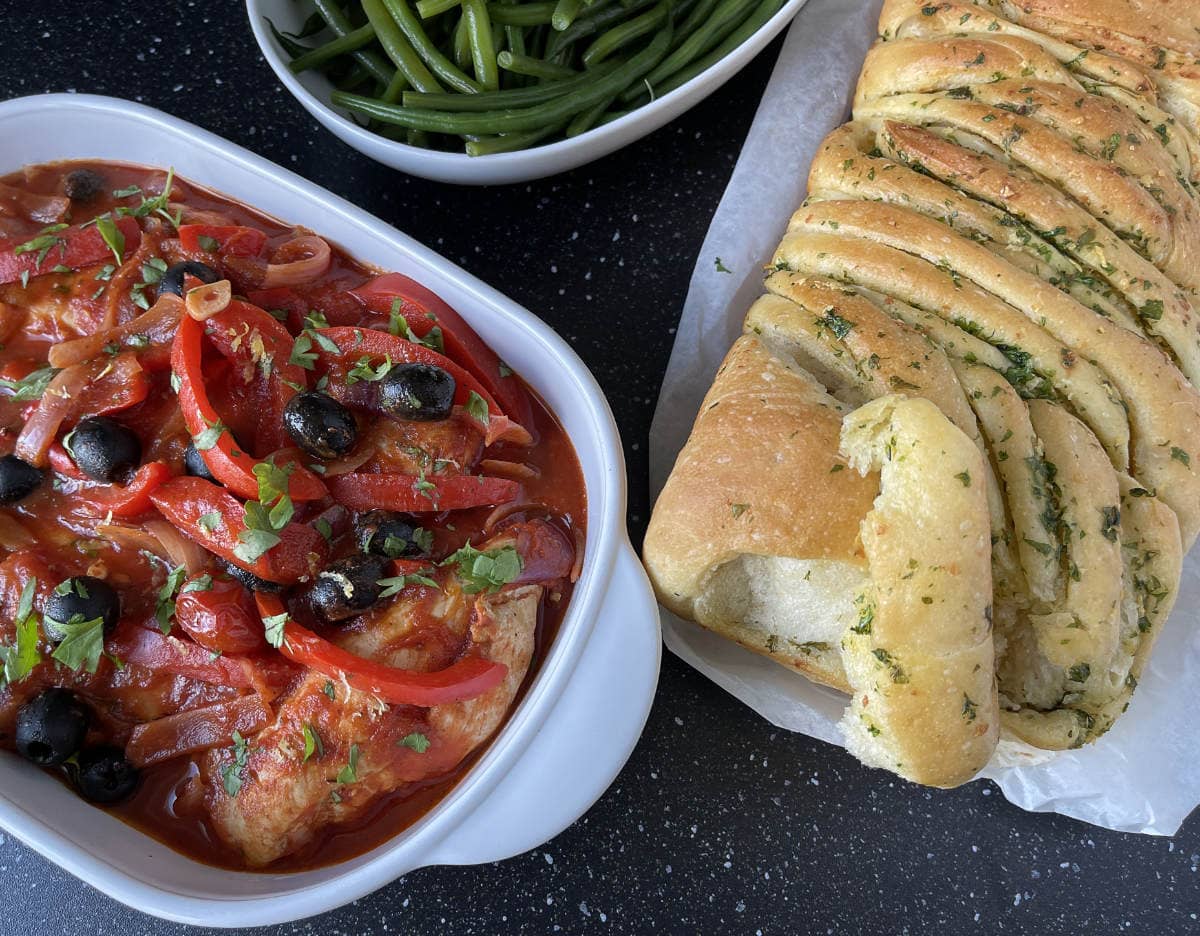
We love to serve this pull apart garlic and herb bread pairs as a starter with anti pasti. It also pairs perfectly with:
- Homemade Chilli
- Pasta dishes – ideal with our vegetarian lasagne.
- Slow Cooker Mediterranean Chicken.
- Slow cooker Sausage and Bean Casserole
Let’s Keep In Touch! You can Find Me On Pinterest, Instagram, Facebook and Twitter
Garlic and Herb Twist Bread
Ingredients
Bread Dough
- 500 g extra strong white bread flour
- 2 tsp salt
- 1 tsp sugar
- 1 tsp instant yeast we use Dove’s Farm
- 4 tbsp tablespoons rapeseed oil / Canola oil use refined rapeseed oil for cooking
- 300 ml lukewarm water about 30-35°C / 86-95°F
Garlic and Herb butter
- 125 g softened salted butter
- 3 cloves garlic crushed
- 4 tbs chopped fresh basil oregano or parsley approximately ½ cup without being pressed down
Instructions
Make Your Dough
- By hand: In a large bowl, mix together the flour, rapeseed oil, salt, sugar and yeast. Form a well in the centre of the ingredients.
- Add a little water into the well and mix thoroughly. Keep adding water a little at a time and mixing until you have formed a ball of dough.
- Transfer dough to a floured surface and knead for 10 to 12 minutes. The dough should feel smooth, elastic, and slightly tacky but not sticky.
- Check your dough is ready by using the windowpane test.
- KitchenAid: Add flour, oil, salt, sugar and yeast to the mixing bowl, make a well and add the water.
- Mix on slow speed number 1 for 1 to 2 minutes.
- Turn up to number 2 speed for a further 8 to 10 minutes.
- Check your dough is ready by using the windowpane test.
Prove Your Dough
- Place your dough in a large greased bowl and cover.
- Leave to rest in a warm place for at least one hour or until doubled in size (time may vary depending on room temperature).
Prepare the Garlic Herb Butter
- Mix softened salted butter, crushed garlic and chopped herbs in a bowl until fully combined.
Shape Your Dough
- Transfer the dough to an oiled work surface.
- Shape by rolling the dough into a rectangle 9 x 18 inch.
- Spread the garlic herb butter evenly over the surface leaving a ¼inch border.
- Roll up the long side tightly into a log just as you would for cinnamon buns and pinch the seam together.
- Cut in half lengthwise revealing the layers.
- With the cut sides facing upwards, twist the two sides together and pinch each end to seal.
- Transfer to a 2 lb (900 g) loaf tin lined with parchment.
Second rise and bake
- Cover loosely and let rise for 45 minutes.
- Preheat oven to 200°C (180°C fan) / 400°F (350 °F fan)
- Bake for 35 to 40 minutes until golden brown.
- If browning too quickly, tent with foil.
- Brush with extra melted butter and sprinkle fresh parsley.
- Let the bread cool for about 10 minutes before serving.
Notes
- Preparation time does not include proving time.
- Herbs – use whatever fresh herbs you have on hand. Parsley, oregano, basil and chives work well. Be careful if you use rosemary or thyme, it can be quite pungent so use sparingly.
- An easy way to check your loaf is sufficiently baked is to measure the internal temperature with a food thermometer. The internal temperature of your loaf should be 90°C / 194°F to 95°C / 203°F.
- Store Garlic and Herb Twist Bread in a bread bag or airtight container for up to 3 days. Sometimes, bread can become a little stale after a couple of days. Just reheat for 5 to 10 minutes at 200°C (180°C fan) / 400°F (350 °F) fan to warm through.
- Freezing – cool completely, wrap well, and freeze for up to 3 months. You can also slice before freezing so you can take out just what you need.
- Defrosting: Leave at room temperature for a couple of hours.
Nutrition information is approximate per slice of the 2 lb loaf. It is meant as a guideline only.

My mouth is literally watering right now! I am a lover of bread…add herbed butter to it and I am in a bread coma! I am going to try someday. I have never baked my own bread. I always just pick it up fresh from the bakery. Thanks for sharing this delightfulness with #momsterslink.
Thanks Trista & you’re most welcome. I hope you do try making bread, it’s worth it just for the wonderful aroma in the kitchen 🙂
Ooooohhhh, if I could eat bread, this would be on my list! I’m actually drooling.
#foodpornthursdays
Thanks Vanessa, such a shame you can’t try it. It’s on my list to try some gluten free breads.
Fantastic step by step photos, plus bread and garlic can smell it cooking right now! #foodpornthursdays
Thanks Sam. Sometimes I get so involved with making a recipe I forget to take a photo, luckily I remembered this time 🙂
This looks delicious. And I too love how your images help to explain the shaping process. It can be quite difficult some times to express a particular technique / process but you’ve done it beautifully. 🙂 Popped over from Food Porn Thursday. I shall be pinning this to make later 🙂
Angela x
Only Crumbs Remain
This looks so delicious and unusual! Great for taking a non garlic butter version on a picnic and tearing and sharing with cold meat / cheese etc . Love it.
Well I can definitely vouch for this, it works a treat and tastes lovely. My twisting skills are a bit poor, but my excuse is the hot weather was making my butter melt so I was getting in a bit of a mess 😀
What a clever idea – great when you have people round to share
Thanks Louise. If we haven’t got people coming round I make the Garlic & Herb Twister Bread for just the two of us & freeze the rest. Thanks for visiting my blog 🙂
Mmmm this sounds delicious and you make it sound acheivable, even for a novis like me! Sounds perfect as a BBQ side when entertaining. Thanks for sharing 🙂
Thanks Sarah & it’s a pleasure to share the recipe 🙂
I always wondered about twisty ring breads and how they were made. Definitely something I will try.
Thanks Paul, I chose the easiest way to do it, there’s some out there that look quite difficult to achieve. Let me know how you get on.
Thank you for this recipe! I love how detailed it is and all the photos. I’m always a bit anxious about bread, but I certainly will give it a go. Looks delicious!
You’re welcome Elizabeth & thanks. It’s good to get feedback on a recipe, it’s difficult sometimes to gauge how much to put in a recipe & which photos to include. Let me know how you get on 🙂